Getting Started
This page will take you through the installation of MATLAB and where to access the “on-ramp” self-paced material provided by MathWorks.
Installation
Follow the instructions at the following link to install MATLAB on your personal machine. https://uob.sharepoint.com/sites/itservices/SitePages/matlab.aspx.
MATLAB should already be installed on the university desktops used during the computer labs.
Download the supporting MATLAB content for the following GitHub Repository
Extract the files from the ZIP folder and place them somewhere sensible. If you open MATLAB and enter
userpathinto the command line it will return a suggested path which is typically in your Documents folder.
If installed correctly your folder structure should be something like this
Documents/
├── MATLAB/
│   └── i2sc_worksheets/
        ├── +util/
│       ├── Worksheet1/
│       ├── Worksheet2/
│       ├── Worksheet3/
        ├── Worksheet4/
        └── README.md
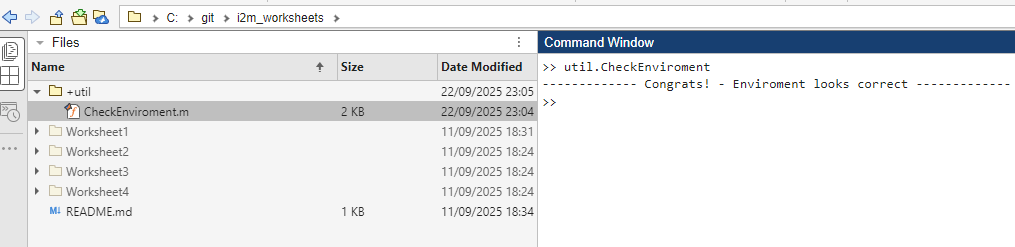
Change the working path in MATLAB to the root of the worksheets (“i2sc_worksheets”), then type util.CheckEnviroment into the command window, you should see the result
Self-Paced Learning Material
MathWorks (The Company who develop MATLAB) provide a series of high quality self-paced courses on there website.
During week one please:
- Complete course MATLAB Onramp
- Complete Worksheet 1
The more familiar with MATLAB you are, the easier you will find many of your coursework’s in the proceeding years. Although not required as part of this mini-series, completing learning paths such as Build MATLAB Proficiency in your own time will greatly improve your abilities.
Finding Documentation and Getting Help
One of MATLABs greatest strengths is in the quality of its documentation. The MATLAB functions help and doc are extremely helpful when trying to understand how to use in-built function in MATLAB. For example entering
help plot
in the command window will show the documentation string for the plot function. Showing you the syntax for calling the function, and the possible input and output arguments.
The function doc opens the online documentation for a function. E.g. entering the following in the command line
doc plot
will take you to the online documentation for the plot function, with lots of helpful examples of how to use it.
The syntax of doc plot may seem slightly unintuitive. This is a piece of syntactic sugar, and is equivalent to entering doc('plot'). E.g. the space means “plot” is used as a character array in the first input of the function “doc”.
You’re Probably not the First to ask a Question
MATLAB is a widely adopted language with an active community. Searching “How to plot multiple lines on a single figure matlab” in your search engine of choice will likely lead you to either:
- An official example of the MathWorks website (Create 2-D Line Plot)
- A thread on the official MATLAB community Forum MATLAB Answers
- Indeed, if you are particularly stuck you can ask your own questions to the MATLAB community (Ask a Question). But don’t ask people to complete your coursework; you’ll be met will some quite curt responses.
Make use of these online resources, if you ask a question in the labs our first response may well be “What did you try googling?”
A Note on Using LLMs
Large Languages Models (LLMs) such as ChatGPT and Claude are surprisingly good at MATLAB (most of the time). However using these tools effectively becomes a game of prompt engineering. Vague prompts such as:
write a function in matlab to interpolate data
doesn’t have the required context to help LLMs create effective code. Instead, a well-structured prompt like:
I need a MATLAB function with the signature [y_interp] = linearInterp(x, y, x_query)
that performs linear interpolation. The function should:
- Take vectors x and y (data points) and x_query (points to interpolate)
- Return y_interp (interpolated values)
- Handle the case where x_query values are outside the data range by extrapolation
- Include input validation to ensure x and y are the same length
provides clear specifications that will result in much better, more reliable code. Furthermore, asking for clear comments and for the LLM to check for functions that already provide similar functionality is advisable (e.g. the specification above is that of the in-built function interp1, but the LLM may try to re-invent the wheel)
There are code blog posts on this topic, such as Don’t Let Your LLM Hallucinate
Remember, to also check any auto-generated code. You should be able to understand every line of your code, as you may need to alter its functionality later!
For this course it is strongly advised you avoid using LLMs to complete the worksheets. Developing your own strong understanding of coding will enable you to write more effective code in the future. Each of your future course will have there own policy on the use of LLMs.